Deploy Multiple Websites With Different Domain Names On The Same VPS Using Docker and Nginx
Full Stack Developer l Software Engineer
For more than 4 years (between 2014 and 2018) I was using PHP as my main stack for developing websites for my clients, at the same time, I have multiple websites using WordPress as a content management system deployed on shared hosting and never had a problem.
About 5 years ago, I changed my stack from PHP to NodeJS/Typescript which become my main stack from then. I started facing an issue with the deployment of my apps since the shared hosting I was using does not support NodeJS and I was obliged to look for a solution to deploy at least my staging phase apps.
I was using solutions like Heroku's free plan to test my apps and everything was working smoothly till Heroku decided to limit their free plan. Here I needed to find a solution.
I had less than 8 days to decide and move since my shared hosting was about to renew for another year for 150 USD before taxes. That amount was too much for just a shared 1Gb RAM shared hosting that supports only PHP.
I ordered a VPS with 4 Cores CPU and 8GB of RAM for 141 CAD tax included and that gives me way much space to play with. I just wanted to give you a brief of the story, let’s deep dive…
I assume you have some knowledge of Linux and Docker and of course, Command Line(Terminal). I will not cover them in this article.
After connecting to your VPS via SSH, create a new user with SUDO privileges for security reasons.
Install Docker on your system and assign your new user to the Docker user group to give that user permission to use Docker. To check if the user has been assigned to the Docker group, write this command on your terminal
groups
It will return the group to which your user has been assigned. If you didn’t see the Docker group, you just need to disconnect and reconnect again to your VPS, if you still can’t see it, restart your VPS and reconnect to it again.
Now, we need to create a folder that will hold our website’s files using this command
sudo mkdir -p /var/www/example.com
Replace example.com with your domain name. Make sure that you write it exactly using this format, otherwise, you might face some issues when generating SSL for your website.
Now, you need to add your user to the www-data group, after that change the permission of the WWW folder and all of its sub-folders to www-data
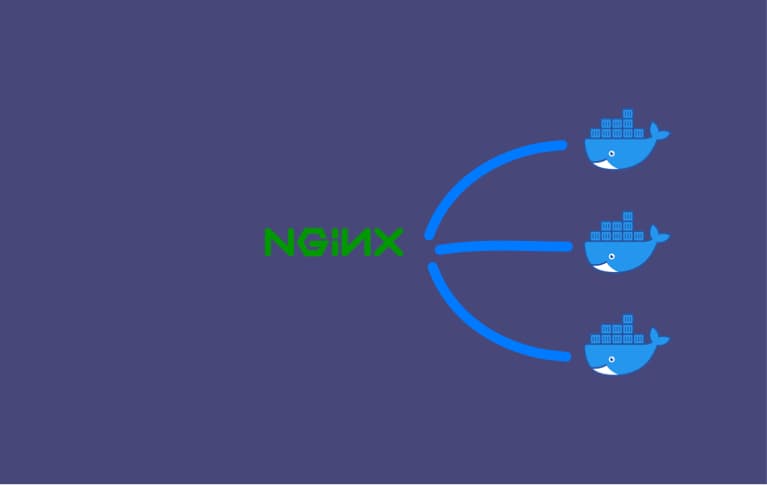
To serve our first website, we need an HTTP server, I will choose Nginx for that(you can choose Apache if you want). To do that, we need to pull the Nginx image from Docker Hub using this command.
docker pull nginx
Now, we need to run a docker container pointing to our new website using this command
docker run -d -p 2023:80 --name example -v /var/www/example.com:/var/www/public nginx
Simply, this command is running a new docker container in detached mode, this container is running Nginx using the 2023 port
Let’s add our website’s files to the folder we just created for example.com.
I pushed a simple HTML website on my Github account on a public repository so I won’t face permission issues later. Now I clone that repo inside the example.com sub-folder of /var/www
If everything goes well, you can visit your new website by entering the VPS IP address on your browser followed by :2023
Now, you have to point your domain to your server, and to do that, you need to install Nginx to be your reverse proxy which will redirect all incoming traffic to the correct docker image.
sudo apt install nginx
After the installation got done, create a new file in the available sites folder of Nginx using this command.
vi /etc/nginx/sites-available/example.com.conf
Remember, the file name example.com.conf must be identical to the website folder we created before.
Add this content to the file you just created
server {
 listen 80;
 listen [::]:80;
 server_name example.com www.example.com;

 location / {
   proxy_pass http://0.0.0.0:2023;
   proxy_set_header Host $host;
   proxy_set_header X-Real-IP $remote_addr;
   proxy_set_header X-Forwarded-For $proxy_add_x_forwarded_for;
   proxy_set_header X-Forwarded-Proto $scheme;
 }
}
We are one last step from finishing the process. Now, you need to add an A Record of your domain name DNS configuration pointing to your VPS IP address. I usually add 2 records in this way.
A @ IPADDRESS AUTOMATIC
A WWW IPADDRESS AUTOMATIC
Now, we just need to move our configuration file to the available sites folder in Nginx using this command
ln -s /etc/nginx/sites-available/example.com.conf /etc/nginx/sites-enabled/example.com.conf
Reload the Nginx configuration and you are ready to go
/etc/init.d/nginx reload
Everything is well set now, you can serve multi websites by copying the same steps we just did.